Now that your students have settled into routines and are building early skills, you’re probably noticing lots of focus on names—learning classmates’ names, recognizing their own, and beginning to write them. These are key milestones in both literacy and social development.
Like many early learning skills, name writing develops in stages. While each child grows at their own pace, most follow a predictable path as they gain confidence with letters and fine motor control. Knowing what to expect helps you give the right support at the right time—and celebrate each small step along the way.
The Developmental Stages of Name Recognition and Writing
Understanding how name recognition and writing typically develop allows you to meet children where they are. Below is a progression commonly seen in 3–5-year-olds, with age ranges and examples of what each stage might look like in your classroom.
1. Name Awareness (Typical age 2.5–3)
Children start to recognize that their name is special. They react when they hear or see it on labels like cubbies or artwork.
Teacher tip: Use name songs, label everything, and say their name often!
2. Name and Letter Recognition (Typical age 3-4)
Children begin to recognize their name in print and can often pick it out from a group, even if they’re not yet reading. Around this time, they also start to notice individual letters in their name—especially the first one—and may begin to associate letters with sounds (“M is for Mason!”).
Teacher tip: Use name cards for daily routines like sign-in and create name-matching or letter recognition games. Point out the letters often and make simple name crafts to reinforce letter awareness.
3. Writing with Help (Typical age 3.5–4.5)
Children begin writing their name with support—by tracing, copying from a model, or trying from memory. However, without guidance, they may form letters incorrectly, reverse them, or write them out of order.
Teacher tip: To assure good habits, model each letter first using “My turn, your turn.” Have children trace and copy their name with fun tools like markers, sand, or playdough. Praise effort and gently correct as needed to build good habits.
4. Independent Writing (Around age 4.5–5)
They can write their name on their own! If they started learning name in capitals, help them transition to title case (capital letter first and lowercase letters after).
Teacher tip: Encourage name writing daily—on art, journals, and sign-in sheets.
Name writing is more than just a literacy skill—it supports confidence, independence, and identity. Knowing the stages helps you meet each child where they are and make learning playful and meaningful.
Teaching Name Writing: Why It Matters, and How to Do It
Name writing might seem like it will develop on its own, but it’s important to teach it explicitly and correctly from the start. Young children form habits quickly—both good and bad. Without guidance, they may develop incorrect strokes, letter reversals, or poor pencil grip that are harder to fix later.
Consider starting name writing with all capital letters, which are easier to recognize and form. Around ages 4–5, most are ready to move to title case (capital followed by lowercase) when they can tell the difference between letter types, start at the top, and use a proper pencil grip.
No matter the format, begin with:
- Clear instruction—Name the letter, model top-to-bottom strokes and use consistent language.
- Model one letter at a time using “My turn, your turn” cues. Continue until correct formation is consistent.
- Keep practice short and engaging—one or two name-writing attempts per sitting is plenty.
Be consistent, celebrate effort, and gently guide good habits and correct formation.
Name in Capitals
Writing Tool: Crayon
Paper: Use 2 paper strips (1 for teacher, 1 for child)
Paper strips reduce the surface area and guide left to right writing. Write only capital letters in the strips. Make paper strips by cutting an 8.5 X 11” piece of paper into fourths in landscape orientation or download the “Capital Practice Strips” Printable available through the Resource tile in your Interactive Digital Teaching Tool.
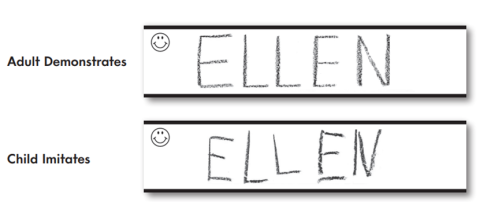
Method: Put your strip above the child’s. Demonstrate writing one letter at a time on your strip and wait for the child to imitate you on theirs.
Tip: For children who need more guidance, write their name in highlighter on their strip as a model to trace. Mark letter start points as needed.
Title Case Name
Writing Tool: Pencil
Paper: Use wide double lines
Writing on paper with wide spaced lines gives children guidance to correctly size and place lowercase letters on the lines. Make your own by drawing lines about 1.5 inches apart on blank paper or download the “Help Me Write My Name in Title Case” Printable available through the Resource tile in your Interactive Digital Teaching Tool.
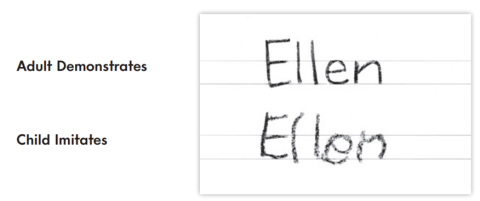
Method: Demonstrate writing one letter at a time and wait for the child to imitate you.
Teacher Tip: Incorporate the Hand Activity to help children understand lowercase letter size and placement differences before they write the letters in their name.
Final Thoughts
Helping children learn to recognize and write their name is one of the most meaningful early milestones in Pre-K. It supports identity, independence, and foundational literacy—all at once!
By understanding the developmental stages, providing one-on-one support, and involving families, you're setting students up for success not just in handwriting, but in learning as a whole. Every name written is a small but powerful step in their journey as readers and writers.